
How to Dockerize your Spring Boot
Write simple app with REST API, dockerize it, and invoke API in a running container

Why Docker and What is it?
A Docker container is a lightweight isolated place in your OS, where your application can reside and function independently - as though it is on some other machine. Whatever stack your code is in, you shouldn’t worry about having it all installed in your OS, just enough to write down step-by-step instructions on what it should contain and how to run it. This set of instructions is the content of the Dockerfile and will help us build the Docker image of the application. This image is some sort of precompiled environment for your application with the application itself in it. All you need to do to make it alive is to run the image, which will result in a running Docker container.
Why do we need it? Imagine it being an automated way of retelling to other people how to install all the dependencies and run the application. Whether they have Windows, Linux, or MacOS - the same Dockerfile should suffice. Isn’t it great?

Step 0: Make sure Docker is installed
To continue with the guide you will need to have Docker installed on your machine, for example, Docker Desktop, works seamlessly on MacOS and Linux, is fine on Windows too, although will additionally install WSL (Windows Subsystem for Linux). After installing, you need to start the Docker daemon by starting the Docker Desktop, to check if it is running simply execute docker in the terminal, if there is no error - you are good to go. Keep in mind, that it might take a bit of time to start.
Step 1: Spring Boot application
Before we begin, all the code can be found here.
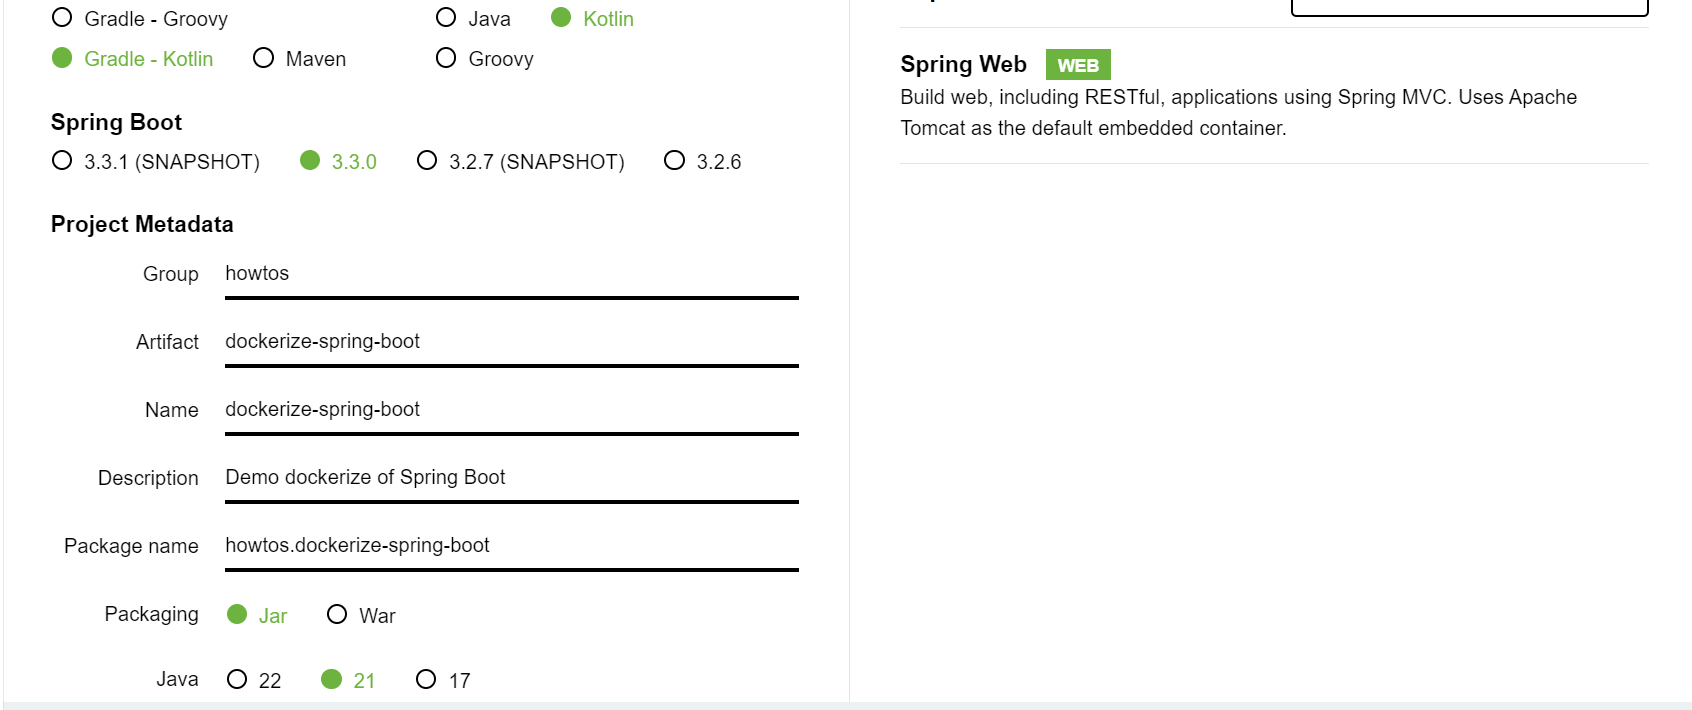
The easiest way to start is to go to https://start.spring.io, choose Spring Web dependency and we are all set, see what I chose in the screenshot below.
Step 2: Create a simple endpoint
We only need the simplest functionality to check that the app is running correctly. Let’s create a REST controller and add one endpoint.
@RestController
class Controller {
    @GetMapping("/static/text")
    fun getStaticText(): String {
        return "Static text"
    }
}
After we run the Spring Boot app, for example via gradle bootRun we should be able to reach http://localhost:8080/static/text with the help of a browser or any HTTP client.
Step 3: Create Dockerfile - Base Image
Let’s start writing a set of instructions = Dockerfile. Now imagine, we have a sort of empty box - this isolated place in our OS, which we need to populate well enough to make our application runnable there. The most confusing here for newbies is that we need to choose the base image, which would serve as a foundation. How would you choose it and why most of them are Linux-based?
The Linux operating system is the de facto standard for server environments and a natural environment for containers due to the whole containerization principle evolving from Linux’s resource allocation and process isolation. For example, the Alpine Linux base is a good starting point, it is just 5 MB in size! It contains the most basic system libraries and utilities, it doesn’t have GUI, and like any other image, it won’t contain the Linux kernel which should be provided by your host OS, outside of the Docker image/container of yours. In Linux host OS it is a Linux kernel, in MacOS it is a lightweight Hypervisor creating Linux VM under the hood, in Windows it is WSL (Windows Subsystem for Linux).
Now when we know about base images, how do we install JDK? We could take that Alpine Linux one and install JDK ourselves, or we can take a base image with JDK baked inside it already. For example OpenJDK base, but it is no longer supported, so let’s use Amazon Coretto OpenJDK base. Our first line of Dockerfile will look like this:
FROM amazoncorretto:21-alpine-jdkThis way we show that we want our foundation to be: Alpine Linux + Amazon OpenJDK 21. We can use amazoncorretto:21 as well, but it is almost twice the size, just because it is not based on Alpine Linux.
Step 4: Create Dockerfile - Build and Run
We have our foundation done, and we can be sure that our image/container will have JDK installed. Now, let’s go the naive way and first build the code with Gradle to get our jar file ready. To do so, run in the terminal:
./gradlew buildLet’s return back to the Dockerfile and fill in the remaining instructions, here is a complete file:
FROM amazoncorretto:21-alpine-jdk

COPY /build/libs/dockerize-spring-boot-0.0.1-SNAPSHOT.jar ./dockerize-spring-boot.jar

EXPOSE 8080

CMD ["java", "-jar", "dockerize-spring-boot.jar"]
We copy the jar file with the application to the internals of the new image. Remember, it is an isolated environment? After that, we expose port 8080 as the one that our future running container will listen on. It doesn’t equal the port of the host OS though, it is an internal port of the container. And last, we tell Java to execute the jar file that is placed inside the image.
It is just a set of instructions now, just text. How to actually run it?
First, let’s build an image out of this Dockerfile by executing from the root of the project (where the Dockerfile should be placed):
docker build -t dockerize-image .We tell docker to build an image with the name dockerize-image using the Dockerfile in the current directory (dot in the command above). You can see it by executing
docker imagesNow, we can finally turn that image alive to become a container by executing the following:
docker run --name dockerize-container -p 8080:8080 dockerize-imageHere we tell docker to run a container with a name dockerize-container , which will be derived from the image dockerize-image that we just built, and also we mention the port forwarding, first 8080 means the port of the host machine, and second 8080 mentions the port that was previously exposed internally by the expose 8080 command. You should see in the terminal logs of Spring boot starting up, and as a result http://localhost:8080/static/text should return the response correctly by invoking the REST controller of the app deployed inside the running container.
Step 5: Build a jar inside Dockerfile
We can do better than that and instead of building a jar manually, we can do that already inside the Dockerfile:
FROM amazoncorretto:21-alpine-jdk

COPY build.gradle.kts .
COPY settings.gradle.kts .
COPY gradlew .
COPY gradle ./gradle
COPY src ./src

RUN chmod +x ./gradlew
RUN ./gradlew build -x test

EXPOSE 8080

CMD ["java", "-jar", "build/libs/dockerize-spring-boot-0.0.1-SNAPSHOT.jar"]
This way we copy everything Gradle-related we have in our source code + source code itself to the image. Then we build a jar file, expose 8080, and execute this jar. Run the following to have it come to life:
docker build -t dockerize-image-with-gradle .
docker run --name dockerize-container-with-gradle -p 8080:8080 dockerize-image-with-gradle
It will be rather slow but will result in the working app as before, with one big minus, the size of the image increased 3x ( in my computer from 342 MB to 1.05 GB).
Note: if you are having ./gradlew not found errors from running the Dockerfile above and you are on Windows, you might want to run dos2unix gradlew
Step 6*: Optimized Dockerfile with builder section
We want to build our jar file and remove all the build-related files and source code from the image. To do that, we can have two staged Dockerfile, where the first stage will be busy building the jar, second one is aimed for runtime which will have only the jar to run. That’s what it looks like:
FROM amazoncorretto:21-alpine-jdk AS builder

COPY build.gradle.kts .
COPY settings.gradle.kts .
COPY gradlew .
COPY gradle ./gradle
COPY src ./src

RUN chmod +x ./gradlew
RUN ./gradlew build -x test

FROM amazoncorretto:21-alpine-jdk

COPY --from=builder /build/libs/dockerize-spring-boot-0.0.1-SNAPSHOT.jar ./dockerize-spring-boot.jar

EXPOSE 8080

CMD ["java", "-jar", "dockerize-spring-boot.jar"]
To see it in action run the following:
docker build -t dockerize-image-gradle-optimized .docker run --name dockerize-container-gradle-optimized -p 8080:8080 dockerize-image-gradle-optimizedOur image size is back to the size of our jar file + base image, in my computer it is 342 MB, the same as the first image. Checking in the browser http://localhost:8080/static/text works as expected.